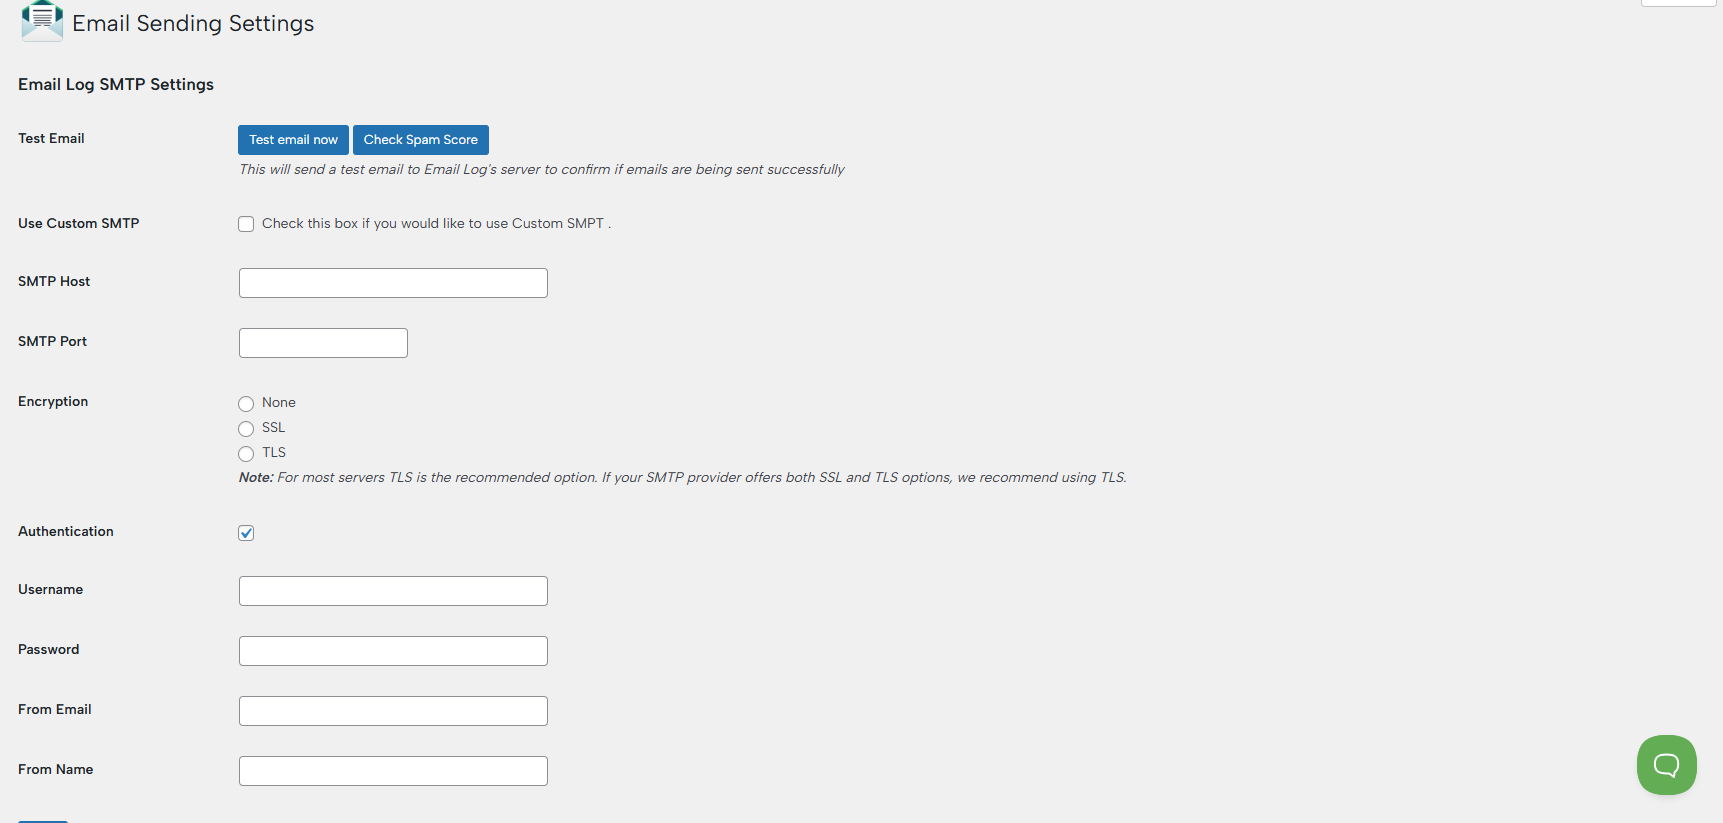
The Email Sending Settings allow you to configure how your WordPress site sends emails. By setting up SMTP (Simple Mail Transfer Protocol), you can significantly improve email deliverability and reduce the chances of messages ending up in spam.
1. Test Email
Before or after configuring your settings, you can verify that everything is working correctly:
- Test Email Now – Sends a test email to confirm that your site can send emails successfully
- Check Spam Score – Analyze your email configuration to identify potential issues that could cause emails to land in spam folders
This helps you quickly validate your setup without needing external tools.
🆕 2. Use Custom SMTP NEW FEATURE
Enable this option if you want to send emails through a custom SMTP provider instead of your server’s default mail function.
- Recommended for better reliability and deliverability
- Works with popular providers like Gmail, Outlook, SendGrid, and others
SMTP Configuration
If you want to use custom SMTP, simply check the box to enable SMTP sending instead of the default WordPress mail function. This is required if you want reliable email delivery.
Once Custom SMTP is enabled, you will need to enter the following details provided by your email service:
Step 1: Enter SMTP Server Details
These details are provided by your email service provider (e.g., Gmail, Outlook, hosting provider, etc.).
SMTP Host
- This is your mail server address
- Example: smtp.gmail.com or mail.yourdomain.com
SMTP Port
- Defines how your email connects to the server
- Common ports:
- 587 > TLS (recommended)
- 465 > SSL
Step 2: Encryption
Choose the type of security for your connection:
- None > Not secure (avoid if possible)
- SSL > Secure, but older standard
- TLS > Recommended for most providers
⭐ TIP: If your provider supports both SSL and TLS, always choose TLS.
Step 3: Enable Authentication
Check the Authentication option. As most of the SMTP servers require logins, use your full email address (for example: you@yourdomain.com).
Step 4: Set Sender Information
This defines how your emails will appear to recipients.
From Email
- The email address that sends the emails
- Example: noreply@yourdomain.com
Note: Must match your SMTP account in most cases.
From Name
- The name recipients will see
- Example: Your Company Name
Save settings and test your configuration. If you don’t receive the test email, double-check the SMTP Host and Port, verify the username and password, and make sure the encryption type is correct.
3. Troubleshooting & Common Errors
Emails Not Sending at All
Possible causes:
- Incorrect SMTP host, port, or encryption
- Authentication disabled when required
- Wrong username or password
- Server blocking outbound SMTP connections
What to check:
- Verify all SMTP details with your provider
- Make sure Authentication is enabled
- Confirm your server allows outbound connections on the selected port (e.g. 587, 2525)
Connection Timeout / Could Not Connect to SMTP Host
Possible causes:
- Firewall blocking SMTP ports
- The hosting provider is restricting outbound email
- Wrong port or encryption mismatch
Fix:
- Try switching ports:
- 587 (TLS)
- 465 (SSL)
- 2525 (fallback)
- Contact your hosting provider to confirm SMTP is allowed
Authentication Failed
Possible causes:
- Incorrect username/password
- Using a regular password instead of an API key (for some providers)
- Account requires special permissions (e.g., Gmail)
Fix:
- Double-check credentials
- For Gmail: Use App Passwords (not your main password)
For services like SendGrid/Mailtrap: Use the provided SMTP credentials (not your login password)
Emails Sent but Not Received
Possible causes:
- Emails are going to spam
- Missing or incorrect DNS records (SPF, DKIM)
- The email does not match the sending domain
Fix:
- Check spam/junk folder
- Verify DNS setup:
- SPF record includes your SMTP provider
- DKIM is enabled (if supported)
- Use a From Email that matches your domain (e.g., info@yourdomain.com)
Emails Marked as Spam
Possible causes:
- Missing SPF/DKIM/DMARC
- Generic sender name/email
- Poor email content (spam-like wording)
Fix:
Configure:
- SPF
- DKIM
- DMARC (recommended)
Avoid:
- ALL CAPS subjects
- Excessive links or images
- Use a recognizable sender name
TLS / SSL Errors
Possible causes:
- Wrong encryption type for selected port
- The server does not support the selected encryption
Fix:
- Match correctly:
- Port 587 > TLS
- Port 465 > SSL
- Try switching encryption type if unsure
Works Sometimes, Then Stops
Possible causes:
- SMTP rate limits
- Temporary provider issues
- Hosting-level restrictions or caching
Fix:
- Check provider limits (emails per hour/day)
- Retry after a few minutes
- Contact hosting support if the issue persists
- Debugging Tips
- Enable plugin or WordPress debug logs if available
- Check your server logs (Apache/Nginx/PHP errors)
- Test with a known provider (e.g., Mailtrap) to isolate issues
- Try sending to different email providers (Gmail, Outlook, etc.)
If you’re still stuck, verify your SMTP settings directly with your provider – most issues come down to small mismatches (port, encryption, or credentials).
PRO Tip: For best results, always use a professional SMTP provider (like your domain email or a transactional email service) instead of default hosting mail. This greatly improves inbox delivery and reduces spam issues.
🆕 4. Check Spam Score NEW FEATURE
The Check Spam Score feature analyzes your email configuration and content to determine the likelihood of your emails being marked as spam. It provides a detailed score along with potential issues, helping you identify and fix problems that could affect deliverability. This allows you to optimize your emails and improve inbox placement before sending them to real recipients.
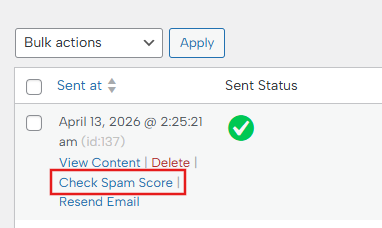
You can check the spam score of all your emails that have been sent to your server:
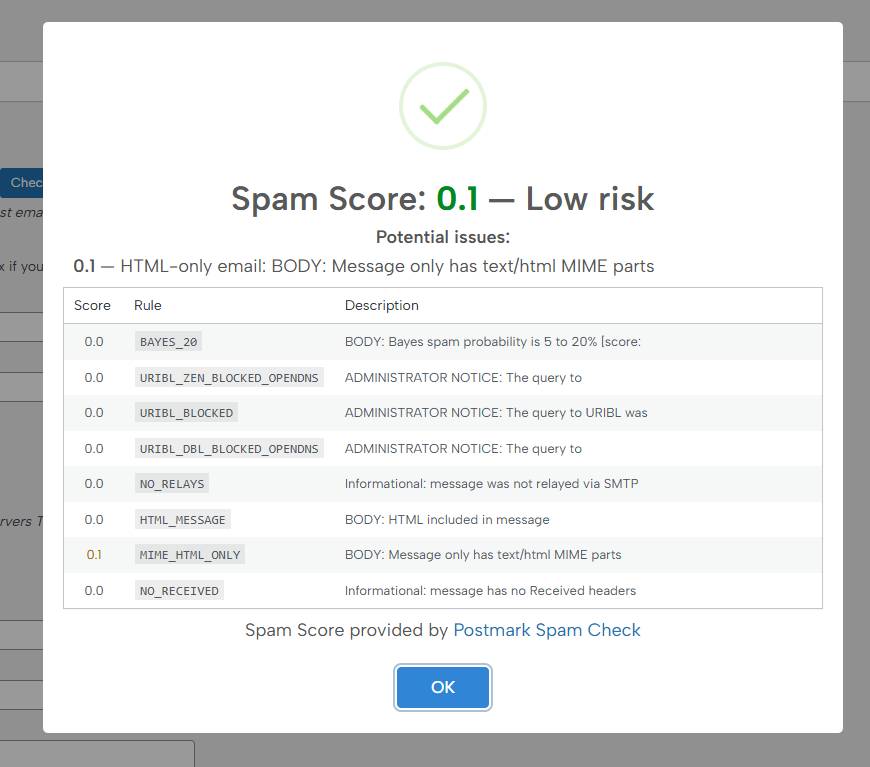
And if you want to check some emails’ spam score individually, you can do that by hitting “Check Spam Score” next to the specific email in the Email Logs section:
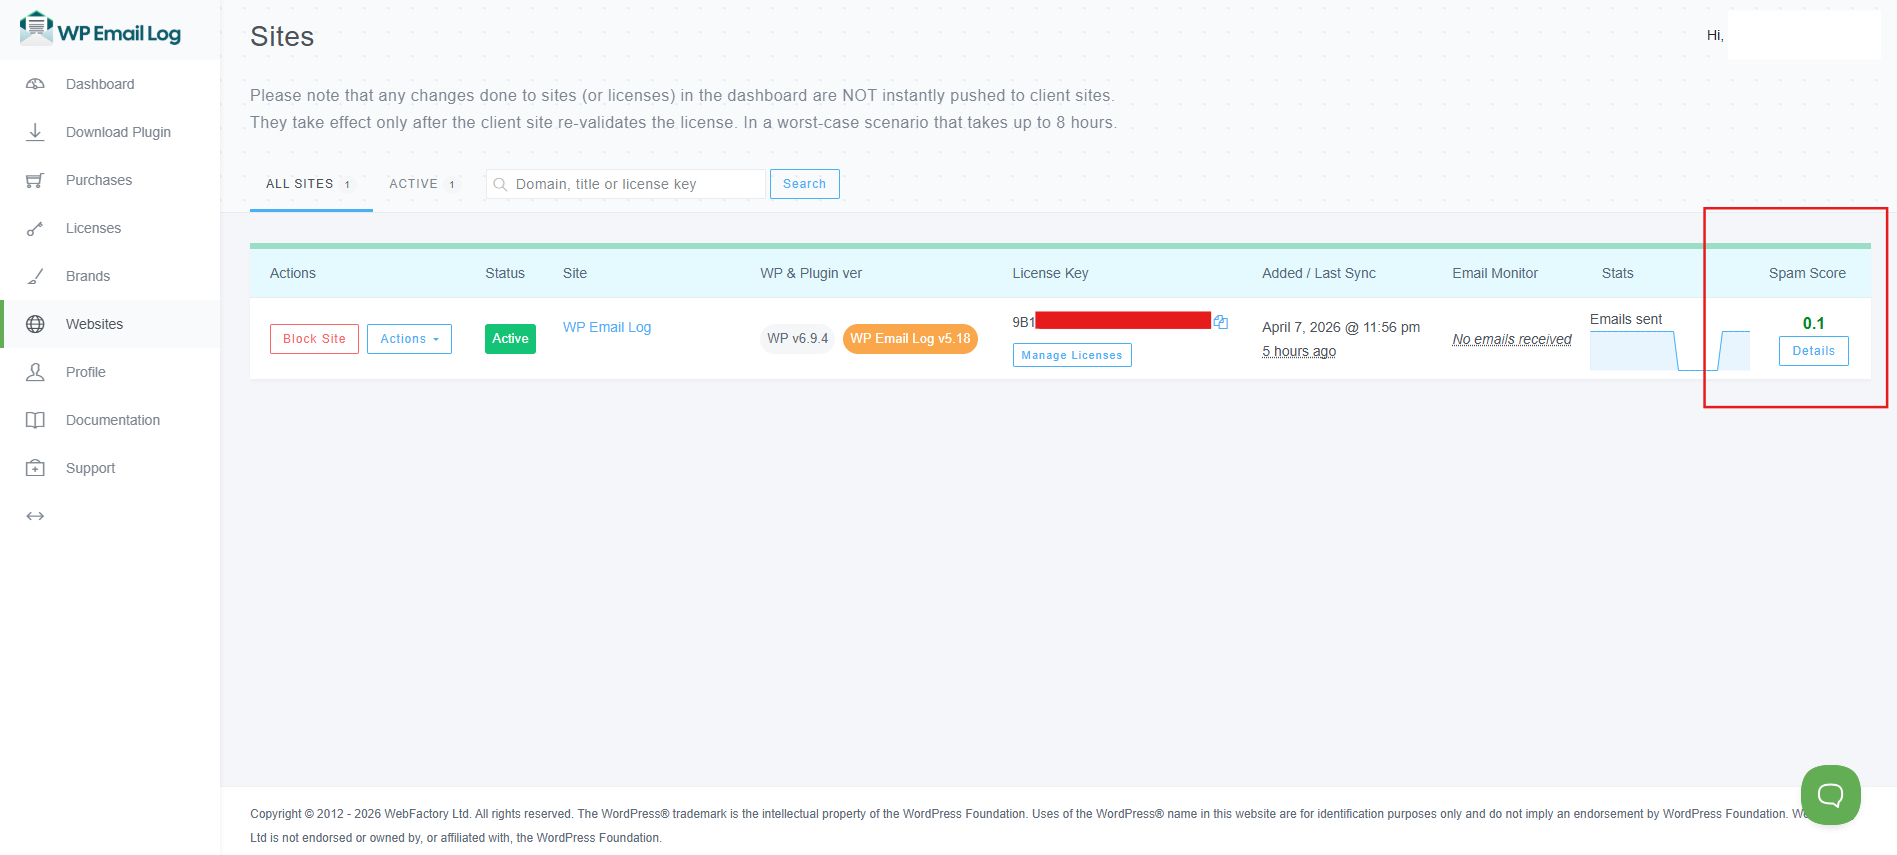
Additionally, the ‘Sites’ section in your dashboard displays the spam score for each website you have connected, allowing you to quickly monitor email deliverability across all your sites.
6. Why Use SMTP?
Using SMTP instead of the default WordPress mail function offers several advantages:
- Improved email deliverability
- Secure and authenticated sending
- Reduced risk of emails being marked as spam
- Greater control over email configuration
The Email Sending Settings section allows you to configure how your website sends emails using a custom SMTP server instead of the default PHP mail function. Using SMTP improves deliverability, reliability, and helps prevent emails from being marked as spam.
⭐ Pro Tip
Always send a test email after saving your settings. If the email is not delivered, double-check:
- SMTP host and port
- Username and password
- Encryption type